 AccessAlly uses your CRM’s automation tags to control access to your membership site and online courses.
When configured properly, you can use these tags to give (or revoke) access to your online courses… and automate it all from inside your CRM.
Three Types of Tags
AccessAlly is built to work with your CRM’s tags so that you can have ultimate flexibility on permission management and automation.
Tags are meant to be used in three main ways:
Access Tags

Access tags control whether or not a user can view the content inside your membership site / online course area. They are most often created through the Course Wizard, and are linked directly to content (page) permission.
We recommend that you do NOT create your access tags manually (create them with the Course Wizard, instead). The reason is because it involves changes to page permissions, which is both error-prone (changes need to be made to all pages) and maintenance-heavy (all future pages require the same manual modification).
The most important characteristic of the access tag type is permission-mapping:
- Clients WITH the tag have access to content X
- Clients WITHOUT the tag do NOT have access to content X
While this point might not seem important, it is crucial in a complex system when there are many tiers / programs.
Example: AccessAlly_Has_Access
Identity Tags
These tags are used to define who a client is, and can be manually created/applied at your discretion.
If your setup is extremely simple, your page-specific Access Tags might double as identity tags. (I.E. “AmbitionAlly_Certified_Partner” both gives a user permission to view a unique set of material on our site and tells us that they are members of our Certified Partner program.
You might also use identity tags when building out conditional content shortcodes or split tests for your site.
Example: AmbitionAlly_Certified_Parter
Trigger Tags
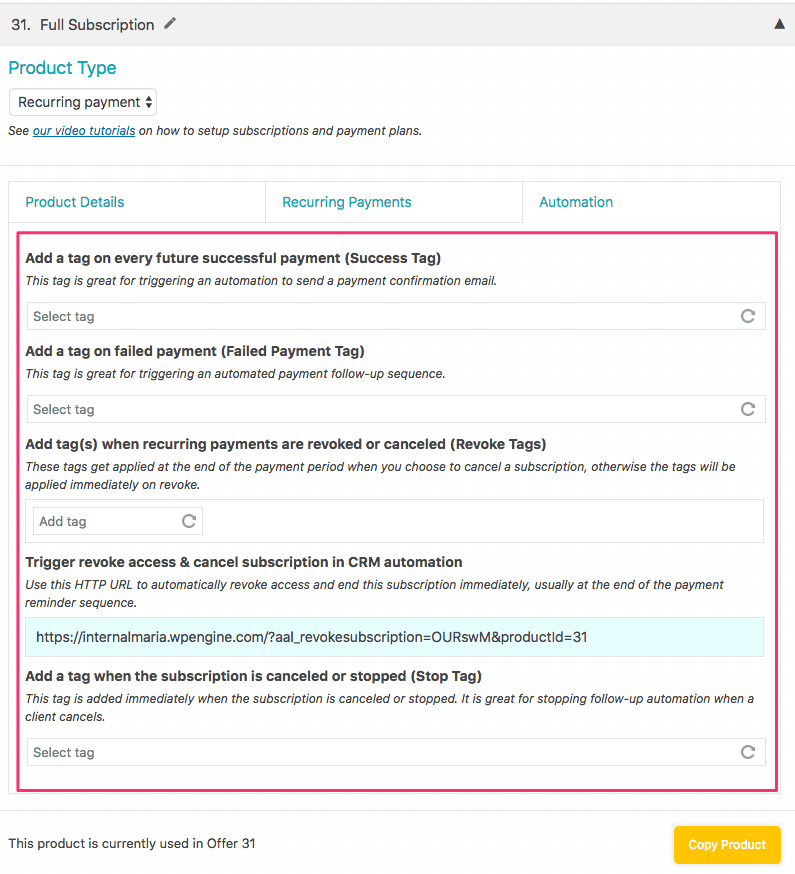
Trigger tags are used to start / stop an automation in your CRM. You’ll find opportunities to designate them throughout your AccessAlly site (in the screenshot above, you’ll see a variety of trigger tags that correspond to a pre-designed automation opportunity).
These are the most dangerous tags, in the sense that they have extremely specific use cases (like stopping a subscription payment), and can only work if you build the “right” automation for them.
These tags must be created manually, and will not work properly unless the automation they need to trigger is built correctly in your CRM.
It is recommended to use a specific postfix to differentiate them from each other (_Made_Purchase, _TriggerTag).
There are 2 main use cases:
- External trigger: a Trigger Tag might be added by an external event (the user made a purchase, a progress completion action, or a link click). Once applied, it is used to trigger a further CRM automation.
- Manual operation: If you create refund / cancel automations inside your CRM, it is recommended to trigger them manually with a trigger tag, to prevent it from accidentally running due to an error. (It can be made safer by building the manual operation in AccessAlly → Manage Users.)
If you wish, you might also add clients to an automation (like a refund/cancel) directly (bypassing the need for a trigger tag), but that has a couple disadvantages:
– There’s a high chance for error, since selecting the correct automation from a dropdown can be tricky.
– There is no audit trail for the trigger
Video Tutorial: How Tagging Works With AccessAlly
If you’re still wondering how “tags” work, here’s a quick video to demonstrate why and how they work with AccessAlly and your CRM system.
Please note that there are two separate videos, to show you the slight difference when tagging in a Standalone Course vs a Stage-Release course.
- Standalone Course
- Stage-Release Course